DIY Marble Ornaments
 Well, it's official. We are completely obsessed with marble. Believe it or not we have been plotting to make marbled ornaments since October and secretly made these last month (out of excitement) just to be ready for you this week. After all, you need time to get these babies done before the tree goes up, right?!
The good news is, we can say with absolute conviction that this is the easiest project we have crafted to date. Seriously. We have a habit of thinking projects are "easy" until we are knee-deep in it and want to break down and cry (ie: failed marbled pumpkins). The only necessary component to these is patience. And trust us, you will have to control yourself from excitement on these when you see how easily they marble and look beautiful. BUT, if you want the end result to remain that beautiful, you need to be patient.
The supply list on these is pretty simple: clear glass ornaments and acrylic paint (we suggest 3-4 colors).
Follow the instructions below:

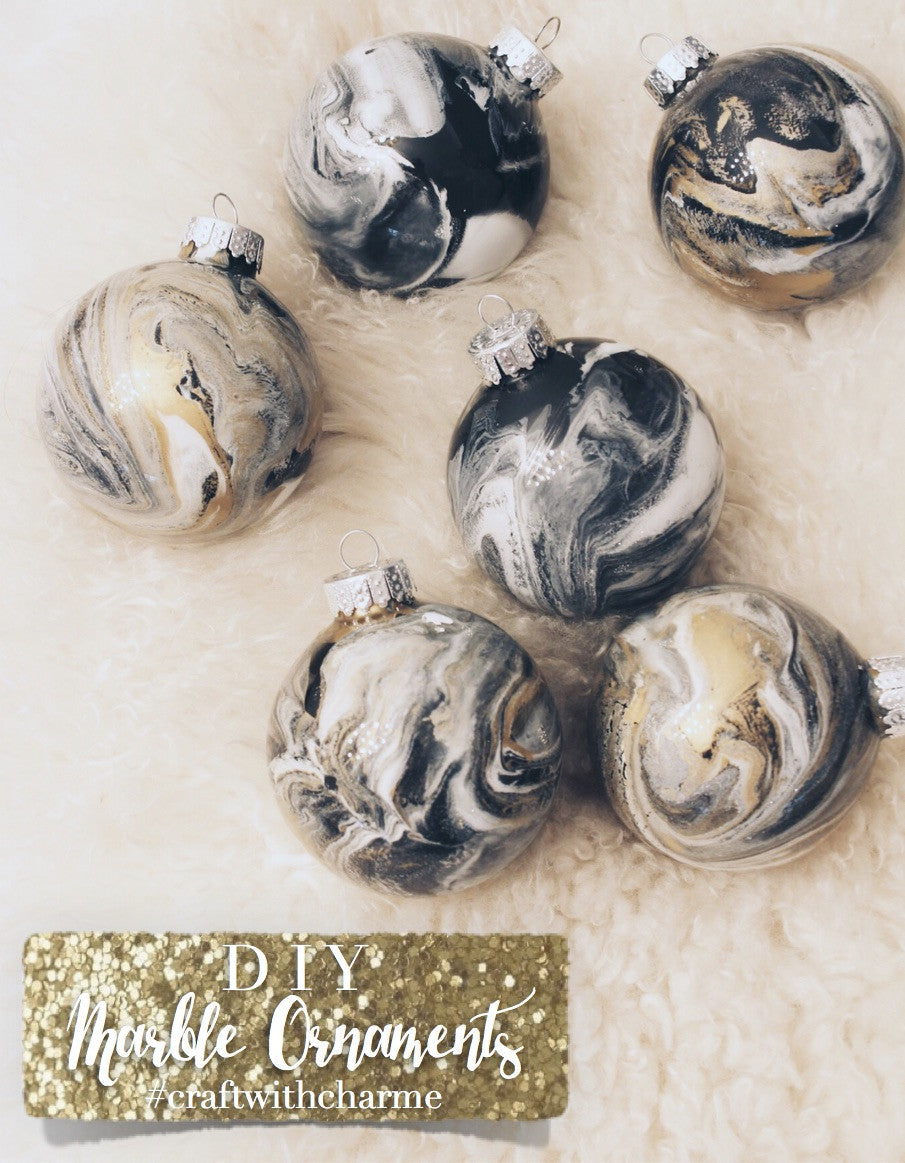
Remove the cap / top from your ornaments and begin dripping the paint (1 drop at a time) into the bottom of the ornament. You will want to layer the colors a few times to create a "puddle" of color. One you've layered them 3-4 times begin Step 2.

Very slowly swirl the ornament (pretend you're swirling a scotch or wine) until the colors create a marbled effect. Super important: DO NOT SHAKE! When you shake the ornament the colors will eventually run together and you will lose the marbled effect.


Once the paint has settled (or stopped moving), lay the ornament on the side you just covered so the paint doesn't drag. You will want to let it dry for a good 15-20 minutes before starting the process all over again. This is what you will need to do several times to get the entire ornament covered. As previously stated though, it will most likely take you and entire day to get the full ornament covered. However, since the project is fairly easy you can do one side, set it down to dry, and go do something else for a while. Let the ornaments dry overnight before every thinking about closing them up.
A few extra tips:
- When you are dripping the paint, if it happens to get on the side before hitting the "floor" of the ornament don't panic. There is really no wrong way to do this (unless you shake it lol!).
- If you have a heavy hand with the paint and feel like you still have a puddle of paint after a full day of drying, you will want to empty them out by draining the ornament upside down.
- The swirling motion comes from the wrist. Don't get too aggressive with the swirling.
- If you are doing other color combinations, adding black is kind of the greatest thing ever. It just adds a contrast that is necessary to the marbling.
- Be aware that white takes over. If you are using white, drip a little less of it than all the other colors.
- Don't be like us! Over-buy paint and return what you don't need. There is nothing worse than needing to go back to the store mid-project. Especially if this is your first time, you will most likely use more than actually necessary.
- Don't overthink it! Marbling is an organic process so just have fun with it!

Leave a comment
Comments will be approved before showing up.


 just to be ready for you this week. Afte...&media=//www.charmesilkiner.com/cdn/shop/articles/craftwithcharme_600x.jpg?v=1449077752)